infra CONVERT
blue DAT • infra DAT
mdm TOOL
infra CONVERT
blue DAT • infra DAT
mdm TOOL
This is an old revision of the document!
With this function you can:
Important If you use infra CONVERT as a module in a CAQ system, the test plan will automatically be saved in the CAQ system’s default path when saving a project (see Functions > Projects > Save project; Introduction > User manual tips > If infra CONVERT is integrated into a CAQ system).
Note Information on how to create and edit Excel templates can be found here: User manual infra CONVERT > Additional information Create and edit Excel templates. For information on the structure of the data exchange formats, see an dieser Stelle informieren: Administratorhandbuch infra CONVERT > Export
| Step | Action | Result | |
|---|---|---|---|
| 1 | Open export menu | In the project overview, right-click the test plan version you want to export. | A context menu opens: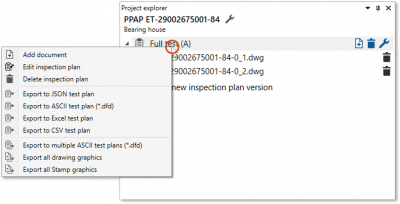 |
| 2 | Export test plan … | You can now export the test plan a) in JSON format (JSONV1). b) in ASCII transfer format. c) in CSV format. d) in individually formatted CSV format. e) in Excel file. |
|
| 2a | … to JSON format | 1) On the context menu, click Export to JSON test plan. | 1) The Export to JSON test plan window opens. |
| 2) Check the additional test plan data and adjust it if necessary. Select the filters to be applied. | 2) The additional data and the filter selection are correct. | ||
| 3) Click Export. | 3) In the file manager that opens, you can now save the file as usual to a location you specify. | ||
| Note Additional data are available from program version 2.10.0. Filters and additional data are available only in the Pro version. | |||
| 2b | … in ASCII transfer format | 1) You can export the test plan version to a combined DFD or DFQ file; to do this, click Export to ASCII test plan (*.dfd, *.dfq). To export the partial test plans to separate DFD or DFQ files, click Export to separate ASCII test plans (*.dfd, *.dfq). | 1) The Export to ASCII test plan (*.dfd, *.dfq) dialog box opens. |
| 2) Check the additional test plan data and adjust it if necessary. Select the filters to be applied. For separate export, select the file format DFD (*.dfd) or DFQ (*.dfq) here. | 2) The additional data and the filter selection are correct. | ||
| 3) Click Export. | 3) In the file manager that opens, you can now save the file as usual to a location you specify. For combined export you can choose here between the file types DFD (*.dfd) and DFQ (*.dfq). |
||
| Notes A partial test plan contains the characteristics linked to a drawing sheet. The additional data can be taken from test plan properties as of program version 2.10.0. Filters and additional data are only available in the Pro version. The selection of the file type DFQ (*.dfq) is possible from program version 3.4.8. | |||
| 2) Check the additional test plan data and adjust it if necessary. Select the filters to be applied. | 2) The additional data and the filter selection are correct. | ||
| 3) Click Export. | 3) In the file manager that opens, you can now save the file as usual to a location you specify. | ||
| Note The additional data are only offered for export if the corresponding setting is set, see Customization. The additional data can be taken from test plan properties as of program version 2.10.0. Filters and additional data are only available in the Pro version. If neither a title line is to be exported and no filter has been defined beforehand, the Export as CSV test plan dialog box does not appear. | |||
| 2d | … to CSV format (individually formatted) | As an alternative to the regular CSV export, you can export an individually formatted CSV test plan based on an Excel template file (XLTX). To do this, follow the instructions for step 2e Export test plan to Excel file. Finally, select CSV as the file type in the file manager. | |
| 2e | … to Excel file | 1) Click Export as EXCEL test plan in the context menu. | 1) The Export as EXCEL test plan dialog box opens. |
| 2) Set the export behavior: Common: Select the desired template file. Determine whether the data should only be transferred to Excel or whether a file should be created directly and whether this should be opened directly after the export. Additional data: Check the additional test plan data and adjust it if necessary. Apply filter to export: Select the filters to be applied. | 2) The export behavior is correctly specified. | ||
| 3) Click Export. | 3) In the file manager that opens, you can now save the file as usual to a location you specify. The available file types are XLSX, XLS, XLSM and CSV. | ||
| Note Microsoft Excel must be installed on the computer to run the export. Additional data are available from program version 2.10.0. Filters and additional data are available only in the Pro version. | |||
Note Available from program version 1.4.2.2.
| Step | Action | Result | |
|---|---|---|---|
| 1 | Open export menu | Click in the project overview with the right mouse button on the project title. | A context menu opens: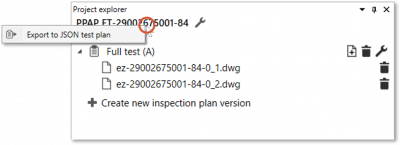 |
| 2 | Export test plan … | Export the test plan … 2a) … in JSON format (JSONV2). |
|
| 2a | … in JSON format | Click Export to JSON test plan on the context menu. | In the file manager that opens, you can now save the file as usual to a location of your choice. |
The function can be influenced via the following settings:
Title row in CSV file
Specify whether or not to export an additional title bar in the CSV file.
See Settings> Settings > Export
Excel template save location
Change the save location of the Excel template files.
See Settings > Settings > Export